
Your adventure starts here.
Install the game, prepare xiloader, then choose one launcher. Ashita v3 is our recommended route.
It is our recommended launcher for CaitsithXI, with a graphical profile editor. Complete steps 1 and 2, then follow one launcher path below. Ashita v4 and Windower 4 are alternatives; you do not need all three. Keep each launcher in a separate folder outside the game installation.
Install the game & prerequisites
Get the Windows client directly from Square Enix. Save all five download parts together, run FFXIFullSetup_US.part1.exe to extract them, then run FFXISetup.exe. A fresh installation needs the game, PlayOnline Viewer, and the offered DirectX components.
Update PlayOnline, then update FFXI through the official retail or trial route described in the LandSandBoat client guide. The installer alone is not a fully updated client. Open FINAL FANTASY XI Config, choose display settings, and save.
Microsoft runtime downloads
Use the x86 Visual C++ packages, even on 64-bit Windows. The current x86 runtime is needed by current xiloader; Ashita v3 also lists the older runtimes below.
- DirectX End-User Runtimes · June 2010 ↗ — extract the package, then run
DXSETUP.exe. - Visual C++ 2015–2022 x86 · download ↗
- Visual C++ 2010 SP1 · select x86 ↗
- Visual C++ 2012 Update 3 x86 · download ↗
- Visual C++ 2013 x86 · download ↗
- .NET Framework 4.8 ↗ — for the launcher’s .NET 4.x requirement if missing.
Sources: Ashita v3 requirements, Ashita v4 requirements, and Microsoft’s download pages.
Prepare xiloader
Get the Windows xiloader.exe asset from the LandSandBoat release page. Use a version compatible with CaitsithXI; a source-code ZIP is not the executable.
| Launcher | Suggested xiloader location | Profile setting |
|---|---|---|
| Ashita v3 | C:\Ashita3\ffxi-bootmod\xiloader.exe | GUI File field |
| Ashita v4 | C:\Ashita4\bootloader\xiloader.exe | INI file field |
| Windower 4 | C:\Windower4\xiloader.exe | XML executable field |
Using the renamed pol.exe method
You may keep the name xiloader.exe and point the profile directly to it. If an existing profile expects pol.exe, first back up the bundled loader as pol-original.exe, then rename a copy of the new xiloader to pol.exe.
- Ashita v3: the bundled loader is normally under
ffxi-bootmod. Point the GUI File field toC:\Ashita3\ffxi-bootmod\pol.exe. - Ashita v4: the bundled loader is under
bootloader. Usefile = .\bootloader\pol.exein the boot INI. - Windower: no rename is needed; point its XML executable field directly to your xiloader.
Show file name extensions in File Explorer to avoid pol.exe.exe. These are files inside your launcher folder; leave the real PlayOnline installation alone. After a launcher update, check that the profile still points to the intended loader.
First put --server caitsithxi.com in your launcher profile’s server-command field:
- Ashita v3: open the profile editor (pencil icon) → Boot → Command.
- Ashita v4: edit
C:\Ashita4\config\boot\caitsithxi.ini→[ashita.boot]→command. - Windower 4: edit the CaitsithXI profile in
settings.xml→<args>.
Follow your chosen launcher section below to save and launch that profile. Keep user/password arguments out for this first connection.
In the loader menu, choose Create new account (usually 2) if offered, enter a unique server username/password, then choose Login (usually 1). Follow the actual prompts if they differ. If registration is unavailable, use the contact page. Website registration is not connected yet.Sources: xiloader and LandSandBoat launcher configuration.
Ashita v3 · Graphical UI Setup
Use the graphical launcher to create and save your profile.
- Put
Ashita.exeinC:\Ashita3. Run it and let it finish downloading its files. - Place the new xiloader in
ffxi-bootmodas described in step 2. - Click + to make a configuration called CaitsithXI. In the editor, use File to browse to
C:\Ashita3\ffxi-bootmod\xiloader.exe, or your renamedpol.exe. - Set Command to the line below. Keep the normal default script. Choose a resolution/window mode in Window, then click the Save icon.
These are official reference screenshots. Their sample server name and address are not CaitsithXI. Use CaitsithXI as the profile name, your xiloader path in File, and --server caitsithxi.com in Command, as shown in the copyable line below.
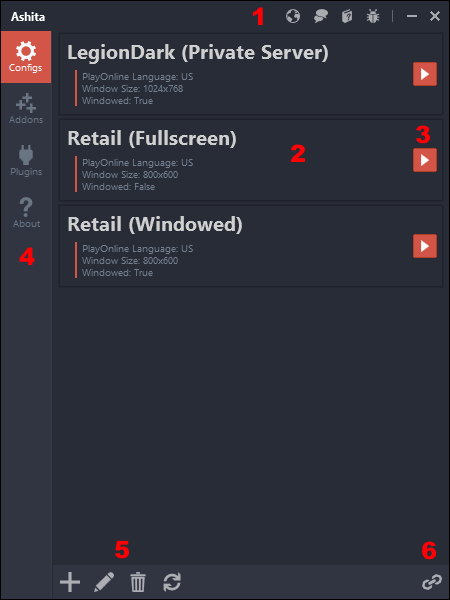
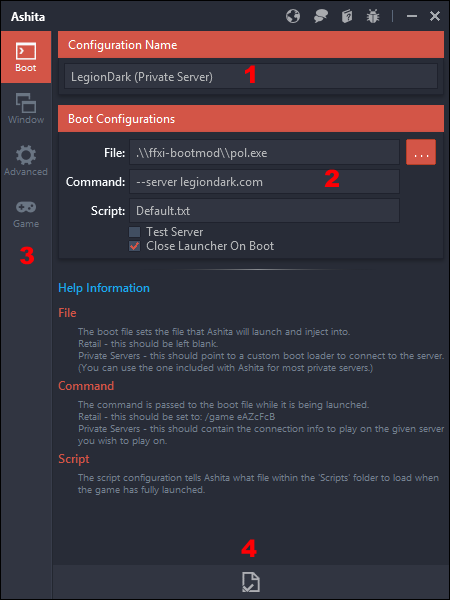
--server caitsithxi.com
Launch & create your account
Select CaitsithXI and press the launcher’s play arrow. Complete the first-account prompts above. Once login works, select the profile and use the launcher’s desktop-shortcut icon to create a shortcut.
The screenshots below are historical bootloader references from another installation. Your path, loader version, available options, and connection messages may differ. Follow the menu labels in your own window.
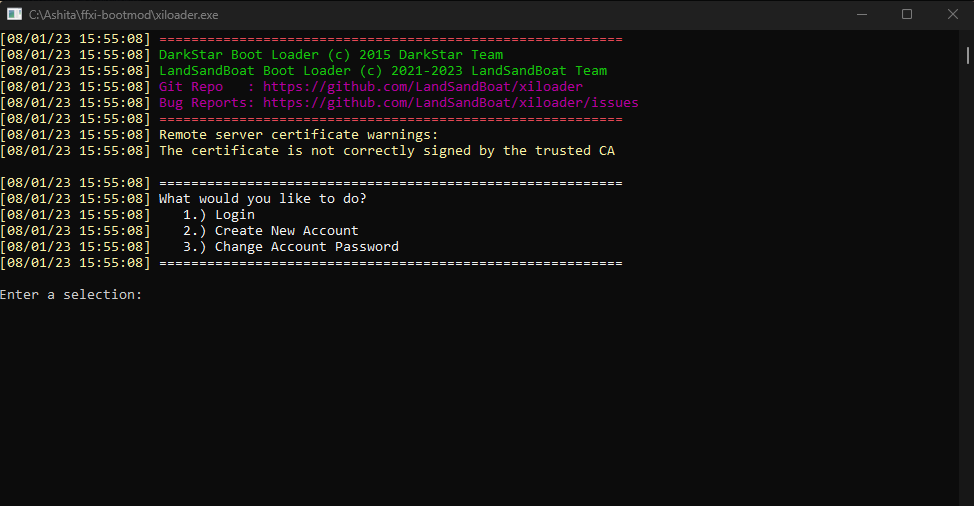
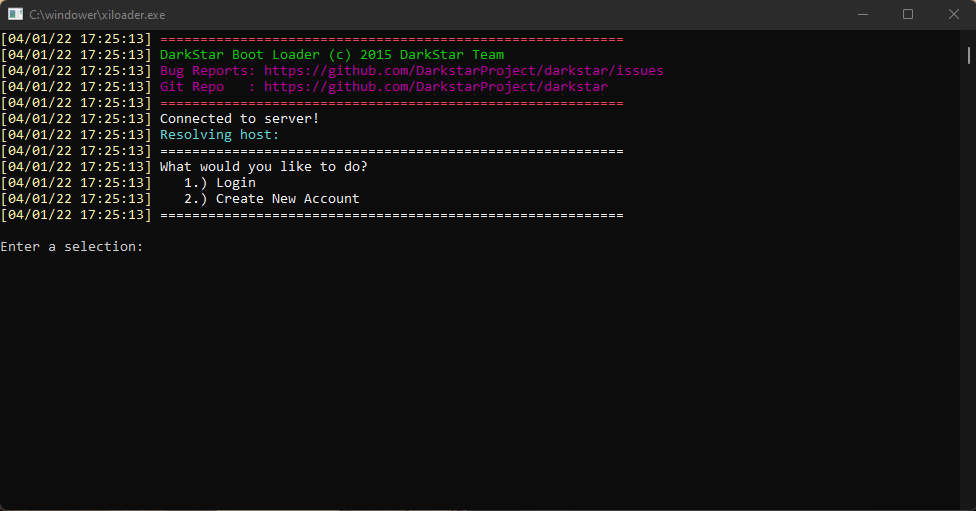
Reference screenshots: FinalSanctum’s connection guide ↗. These show other installations and older loader versions; paths, extra options, and messages may differ. Keep your own profile set to --server caitsithxi.com. The certificate message in the first reference is not a live CaitsithXI status check.
Optional saved login
Edit the same profile with the pencil icon. Replace its Command field with the following, substituting your server credentials locally, and save:
--server caitsithxi.com --user YOUR_USERNAME --pass YOUR_PASSWORD
Saved credentials are readable in the local profile. Use a unique server password and keep the file private. Leave out --user and --pass for manual login.
Source: Ashita v3 launcher and profile editor documentation.
Ashita v4 · INI setup
This path uses an INI and the command-line launcher. Keep it separate from v3 in C:\Ashita4.
- Extract the package contents into
C:\Ashita4. Confirmashita-cli.exesits besideconfigandbootloader. - Put your new
xiloader.exeinC:\Ashita4\bootloader. - In
config\boot, copyexample-privateserver.initocaitsithxi.ini. Replace the existing[ashita.boot]section with the block below; keep other sections.
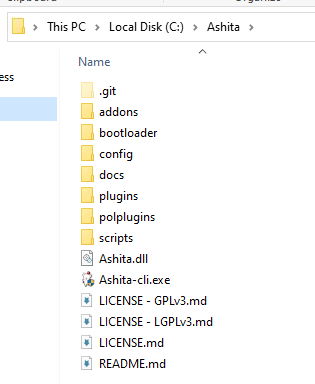
C:\Ashita; this guide uses C:\Ashita4. In your folder, put xiloader inside bootloader, then open config → boot to create caitsithxi.ini. Official screenshot source ↗ · Select image to enlarge.[ashita.boot] file = .\bootloader\xiloader.exe command = --server caitsithxi.com gamemodule = ffximain.dll script = default.txt args =
If you used the pol.exe rename method, change only the file value to .\bootloader\pol.exe.
First launch & shortcut
Create a Windows shortcut to ashita-cli.exe. Set Target as below and Start in to C:\Ashita4. Launch it and follow the first-account prompts.
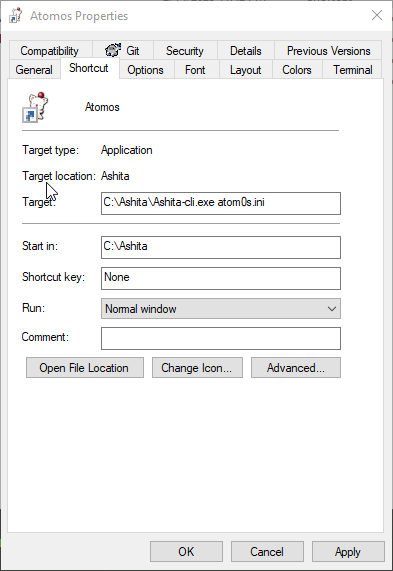
C:\Ashita4. Official screenshot source ↗ · Select image to enlarge."C:\Ashita4\ashita-cli.exe" caitsithxi.ini
Optional saved login
After successful login, replace the INI’s command line with:
command = --server caitsithxi.com --user YOUR_USERNAME --pass YOUR_PASSWORD
Save it and use the same desktop shortcut. The password is readable in the INI; remove the user/pass arguments for manual login.
Sources: v4 boot configurations and v4 shortcuts.
Windower 4
- Install Windower in a separate folder, such as
C:\Windower4, run it once, and let it update. - Use the Profiles tab’s + icon to make a profile named CaitsithXI. Set resolution, region, and window mode, then close Windower.
- Copy
xiloader.exeintoC:\Windower4. Back upsettings.xmlin the Windower folder. - Edit the existing CaitsithXI profile inside
settings.xml. Add or replace itsargsandexecutableentries as shown. Preserve the rest of the XML and its enclosing settings element; do not add a second profile with the same name.
<profile name="CaitsithXI">
  <args>--server caitsithxi.com</args>
  <executable>C:\Windower4\xiloader.exe</executable>
  <!-- Keep your other existing profile settings here. -->
</profile>
First launch & shortcut
Reopen Windower, select CaitsithXI, and press its launch arrow or double-click the profile. Follow the first-account prompts. Select the profile and use pin to desktop for a shortcut.
Optional saved login
After login works, change the existing profile’s args entry to:
<args>--server caitsithxi.com --user YOUR_USERNAME --pass YOUR_PASSWORD</args>
Save before reopening Windower. In XML, replace & in credentials with &, < with <, and > with >. Credentials are readable in this file; keep it private. Manual login is the simplest choice if command-line punctuation causes problems.
Sources: Windower profiles, executable/argument reference, and private-server XML example.
Documentation checked October 17, 2026. The supported client build and loader version still need validation against the running server. These instructions do not test your connection.